
I have mixed feelings about what I am sharing today, but I also really want to share it!
I get questions all the time about which waterproof sealants for paper quilled jewelry to use. The answer I give is that there are a lot of water resistant ones you can do, but few truly waterproof ones. The reason is that to get a truly waterproof finish you need to use more toxic substances like resin. I prefer to use the non toxic water based sealants and topcoats. They are easier to use and you don’t need to be so careful with them. I usually do my work at night which is not a great time to work outside for ventilation!
So for a long time I have been wanting to do some tests to see how different sealants and glazes compare as to how water resistant they really are.
My mixed feelings are because this is just my first experiment. The scientist inside of me knows that I need to repeat the test for accuracy. And I will definitely do that! But I still want to share the preliminary results here.
The Experiment:
To use different brands of sealants, glazes, and topcoats to fully coat paper quilled tight rolls, and then dip in water and put in the washing machine to fully test the water resistance.
Step One:
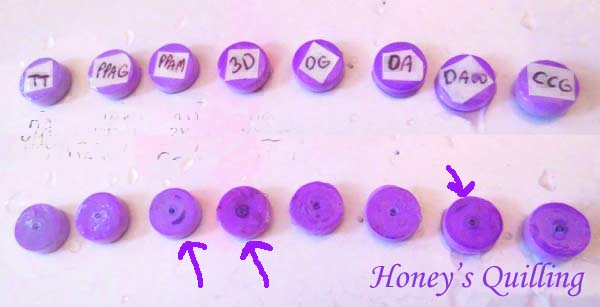
I used the same color of paper to roll 8 tight rolls (I used a 24″ strip for each roll). I then glued a little label onto each piece telling what I was using to coat it.
- TT – Triple Thick Glaze
- 3D – 3D Crystal Lacquer
- PPAG – Perfect Paper Adhesive Gloss
- PPAM – Perfect Paper Adhesive Matte
- DG – Diamond Glaze
(my full review is here)
- CCG – Crystal Coat Glaze
- DA – DecoArt Americana Multi-Purpose Sealer
- DAW – DecoArt Americana Multi-Purpose Sealer mixed with water

I made sure that each piece was fully coat with the sealer. I covered one side, let it dry, did the other side and the edges, let it dry, and then repeated with a thin coat to make sure there were no holes anywhere. I was going to let them dry for about 3 days, but then I got busy so they dried for more like 2-3 weeks. Oh well!
Step two:
A few days ago I decided it was test time! I filled a little cap with water and put all of the pieces into the water and set the timer for 5 minutes:

After five minutes I took them all out, examined them, and took photos. You can see from the arrows that there were a few places where I could see that water got through. for the 3D Crysal Lacquer it was right in the middle, so I think it just wasn’t sealed properly in that spot. The glaze must have gone into the hole but not filled it all the way up, so water still crept into there. It is very important to fully coat a piece! For the PPA matte and the DecoArt sealer mixed with water there were little seepage spots.
I put the pieces back into the water cap for another five minutes, so a total of 10 minutes. The only thing that changes was that the seepage spots for the PPA matte got worse. The one for the DecoArt sealer stayed about the same, maybe a tiny bit worse. All of the other pieces were still totally sealed.

I was going to leave the pieces in the water for up to half an hour, but honestly when people usually accidentally get their jewelry wet it is usually only for a few minutes – in the rain, in an shower, etc. So there is not a lot of point in soaking the pieces for half an hour in water. I’d like to re-do this test to see if the same ones leak. It can always be user error, maybe I didn’t put as much sealant on the ones that leak, you know?
Step three:
But I couldn’t just stop there, I had to to do one more test. A drastic one. An unlikely situation to happen, but sometimes it does (it has happened to me). The washing machine! It happens occasionally that you put a piece of jewelry in your pocket. It happens occasionally that you forget to empty your pockets when you put your clothes in the washing machine (or is that only me?? Tissues all over clothes anyone??) A few months ago one of my daughter’s quilled earrings (this one) got left in a pocket and washed. It wasn’t completely disintegrated, but it was definitely not usable anymore. Bummer! For those earrings I had put on layer of Ceramcoat Sealer
and just one layer of Diamond Glaze that had been thinned with water. Normally I would put on at least two layers if it had been thinned with water, but these were just for our own use so I was lazy and just did one coat.
So for this test I put all of the little pieces in a little cloth and tied it shut and added it to the washing machine with a load of clothes. Ready to see what happened? Here it is!

eek! I found it funny how one of my favorites, the Diamond Glaze, did not fare so well! Diamond Glaze is amazing because it has such a hard finish, it dries quickly, has excellent water resistance against plain water, and is clear and shiny. But apparently doesn’t do so well in the washing machine. I’m guessing it is more dissolvable in soap. Many others did not fare well either.
Here is a photo after they have dried:

Here is what I was impressed with:
The Perfect Paper Adhesive Gloss (PPA Gloss) was perfect. Seriously, perfect! No leakage at all. This test definitely needs to be repeated to see if it was just a fluke or if it really is that water resistant. I am crazy impressed! A close second is the Triple Thick Glaze
. Almost perfectly in tact as well! The others are various levels of being water logged and the coating coming off. For the DecoArt Americana Sealer water had kind of soaked into the paper, but since the sealer also soaks into the paper in the first place it was still pretty sturdy. I want to see what happens when I put a sealer, then a topcoat, then put it in the washing machine.
I think you can sense that there are more of these experiments coming! This was just a preliminary. I can’t wait to widen the scope.
But don’t be put off by the washing machine tests – most of the time that will never happen, it’s just a fun test. As you can see, all of the topcoats and sealers fared well in the 5 and 10 minute water tests. None of those pieces would have been ruined if they were jewelry.
Until the next test, feel free to revisit some of my other posts about sealants! I have more in the works, to stay tuned!
- Click here to see all posts that are about sealants, topcoats, and glazes.
- Click here to view free paper quilling tutorials!
- Click here to view paper quilling tips and tricks!
- Click here to view a list of places to buy quilling supplies around the world!
- Click here to view some of my own quilling projects, with tips so you can make your own if you’d like!
- *All products and supplies mentioned in this post I purchased and/or made on my own.
- *This post contains some affiliate links, and some non affiliate links. If you purchase products through the affiliate links I get a small percentage (at no extra cost to you!). I only link to products that I believe in and/or love to use myself. Thank you for supporting my blog!


I love all the good information you give. Thank you so much. I just found your site and I have subscribed to it. Can’t wait to find more interesting facts.