
(This post has been updated Feb 2018)
Ah, the classic, beautiful rose. When anyone would ask me when I was a kid what my favorite flower was, I’d always say rose. I don’t know why, exactly. Perhaps because my favorite color was red, and the classic rose was red. Anyway, I still love roses! Thankfully it’s fairly simple to re-create my favorite flower with a strip of paper, a quilling tool, and some glue. And today I’m going to share a tutorial showing how I make a paper quilled rose!
*note* if you’d like to see some tips on how to make a paper quilled rose in different sizes, check out this post.

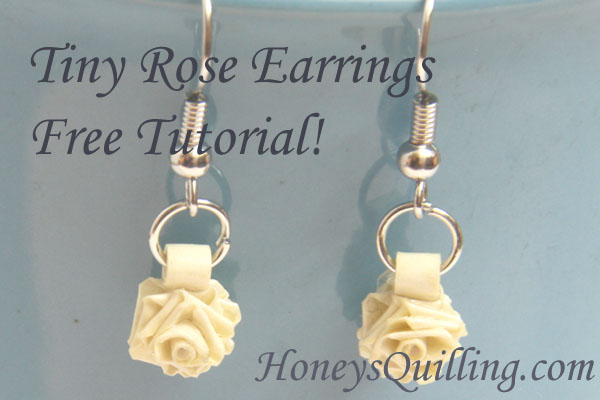
One thing you can do with your paper quilled roses is turn them into gorgeous earrings!
To make a rose you need:
- a strip of paper
- a slotted quilling tool (find it here on Amazon)
- glue (click here to see some posts I’ve written about glue for quilling). My daily favorite is matte PPA
- Fine tip glue applicator bottle. This is optional, you can always just use a toothpick or needle tool to dab the glue on. However, I find the fine tip bottle perfect for squeezing glue into the layers of the rose for the final step
The wider your paper is the larger your paper quilled rose will be. For this example (and for the roses in the earrings shown above) I am using paper that is 3/8″ wide (9mm). I use a strip that is 6″ long. I can do up to 12″ long with this width of paper. With paper that is more narrow you will use a shorter length.

Start by inserting your strip of paper into your slotted quilling tool and roll it just a bit.

Fold the strip of paper backwards at a 90 degree angle, pressing the fold firmly. Continue rolling the paper, but at an angle so that it flares on the top and the bottom corner of the folded triangle portion stays touching the quilling tool.

When you have rolled so that the folded triangle portion cannot be seen anymore it is time to fold your strip backwards again. Continue rolling.

Continue folding your paper and rolling, making sure the top flares out while the bottom always stays close to the quilling tool. When you have finished, take it off of the tool. It will unfold a bit as shown in the middle photo above. That is fine. Now it’s time to glue together your rose! Put a drop of glue on the bottom tab of the paper quilled rose.

Put more dabs all the way up the rose. Then gently push the layers back together into a rose shape. The third photo above shows me turning the layers counter-clockwise to get it to look the best. Play around with it, adjusting it so that not all the corners are on top of each other.

Once you have the paper quilled rose looking how you want it, add a bit more glue to the top layers. For this size rose I can just use this fine tip glue bottle. For a tiny rose using more narrow paper I add an extra fine metal tip to my glue bottle to get the glue into the tiny crevices. The finished glued rose is shown in the center photo above. Don’t worry if it seems like a lot of glue, it will soak into the crevices. The last photo shows the same rose when it has dried. It’s ready to be used in a variety of craft/art projects!
You’ll notice that the dried rose does not have shiny glue spots on it. If you use regular craft glue or tacky glue, you have too be careful not to use too much as you’ll see glue spots. But when you use matte PPA (perfect paper adhesive) it leaves no spots, which is one of the several reasons that I love it!! So if you don’t want to be too careful about gluing, give it a try!
Some things you can use your paper quilled rose for:
1. earrings
2. gift tags
3. greeting cards
4. name place cards
5. notebooks
6. magnet
7. wedding table decorations
8. anything that needs a little decorating!
Want to see more about paper quilled roses? Here you go!
This post will give tips on making different size roses:

This post will show you how to make teeny tiny roses!

And finally, this post shows how to turn those tiny roses into fun jewelry!
Looking for more inspiration? Find more FREE quilling tutorials here. And even more tutorials here
Click HERE to view tips and tricks for paper quilling, divided into subjects!
Click HERE to find where you can purchase paper quilling supplies – many sources listed from around the globe!
*This post contains some affiliate links. If you make a purchase through the affiliate link I get a small percentage (at no extra cost to you!). I only link to products that I use and love. Thank you for supporting my blog!


Thank you for teaching! I’ve seen some works with these and did not have a clue about it! I think I’ll make something for my mother with it, for Easter, I mean!
Have fun! If they don’t turn out right the first time, keep on trying, it can take some practice!
aloha! honey,
thanks for this simple pictorial(i dont know if its even a valid word) tutorial on quilling roses. i looked through so many videos but i never found one understandable(again, i don’t know if its a valid word). i’ll try it out soon!
Thank you for your comment, I’m glad you have found this post helpful!
hi there! i found your website (and post) really interesting. i looked through a whole lot vid. tutorials but neverfound any understandable( dunno if its a valid word)
your pictorial(again, not sure if thats a valid word) turoial was helpful, however i dont seem to have that volume on top. its plain flat rolled for me, it tried it twice till now. thanks!
I’m glad you’ve given it a try! I could give you some tips if I could see a picture of the rose you have made, feel free to email me a picture at Honey@HoneysQuilling.com Otherwise all I can say is that you do have to make more than a couple roses to get the hang of it, so keep trying! Also, pay attention to how you are rolling the rose. The angle of which you fold the paper can make a difference in your design, as well as the placement of the bottom edge of the paper on the tool while you are rolling. Hope that helps a bit, and do feel free to email me a photo so I can give some more particular tips 🙂
which type of glue we should use for quilling
There are many glues that will work for paper quilling. Almost any paper glue will work just fine, though there are some that have features that make them nicer to use. Some people like thicker glues, some like thinner. Some like quick drying, some like gels that don’t dry out so quickly. Some like to make sure the glue is quality/archival and won’t change the color of the paper. If you are making fun little projects like gift tags, you don’t need to worry much about the glue you are using. If, on the other hand, you are making things to last like nice framed pieces, then you’ll want to choose a high quality glue. Here is a post about some of the glues I have used: http://www.honeysquilling.com/glue-tips-for-paper-quilling/
Hello honey!
thank you for your teaching ! may i know from which country are you ?
You’re welcome 🙂 I am from the US, but am currently living in Malaysia
It is very easy to learn . Thank u honey .
You’re welcome, glad it was of help!
It was very helpfull for my doughter to make paper earrings. Thank you for this fine tutorial.
you’re welcome 🙂
so beautifull and u realy make a easy step for me
Thank you for your comment, I’m glad you found the tutorial helpful 🙂
Deepu akka. Ur right its so beautiful
thank you for teaching me to make rose i will gift it to my sister thanks
hey lalu what a sweet name . i am really thankful to honey for teaching me awesome stuffs please do reply me honey dear
Thank you for the comment, I’m glad you are enjoying the tutorials 🙂
this paper quilling is awesome,cool and amazing,thanks a lot.
woow very nice! can u tell me how to make the roses into an earring? pls reply
Hi 🙂 To make this into an earring, you need to add a small roll at the top to put in the jumpring (I use a 1 1/2″ strip of paper to make the roll). Then you’ll need to add sealant to make it sturdy. Check out these posts about different sealants you can use: http://www.honeysquilling.com/sealants-for-paper-quilling/
Hi dear honey… Thanks a lot for adding colors n craft to my hectic life as a doctor.. Im still learning the basics.. Can i send you some pics of earrings i made ?
Hi 🙂 Sure, I’d love to see your earrings 🙂
Tell me to which address i can send the pictures?
amazing
it’s a good thing for students to pass their time
thank u honey for this
you’re welcome, thanks for commenting 🙂
its nice to learn
hello dear honey
thank you for teaching!
Thank you it’s just amazing
iI love it, thank you. Do you have videos, I live in rural MO, internet is sketchy.
Hi 🙂 no, I haven’t done any video tutorials yet
Such a great work!!!
I remember making these in school asa kid…but i don’t remember using a tool…can you do them with a pencil? I’m sure back then they weren’t very pretty roses, and certainly not as pretty as yours, but just curious…It, quilling, brought back some long lost memories for me and that makes your site even more special… Thank you! Blessings for your gift and sharing!
Hi! Thanks for your comment 🙂 Yes, you could use a pencil, though your pieces would not be very defined. If you don’t have a tool it’s better to use a toothpick so that the center of your piece is smaller. I started quilling with a toothpick when I was 10 years old, before I got a quilling tool.