
Finally I have something new to share with you all! This nine pointed star frame design has been a labor of love for me in the past couple months! As I’ve mentioned, Erin from Little Circles hosted her third annual quilling contest recently. I didn’t have time to participate the last two years, and I don’t know when I’ll have time again, so I took the opportunity to work on a project for this year.
My daughter and I were on a 6 week break from homeschooling between grades, so it was perfect timing. I started thinking about what I’d like to do. I definitely wanted to incorporate several quilling techniques in one design. And I definitely wanted to use transitioning as one of the techniques (see how to do transitioning in this tutorial from Erin available here on Amazon or as a FREE download here on her shop website).
I played around a bit with some shapes and spent a few days making a fun project, but it was a fairly small finished project, so I decided to save that and start again. (I’ll be sharing that project soon as well, just need to take some final photos).
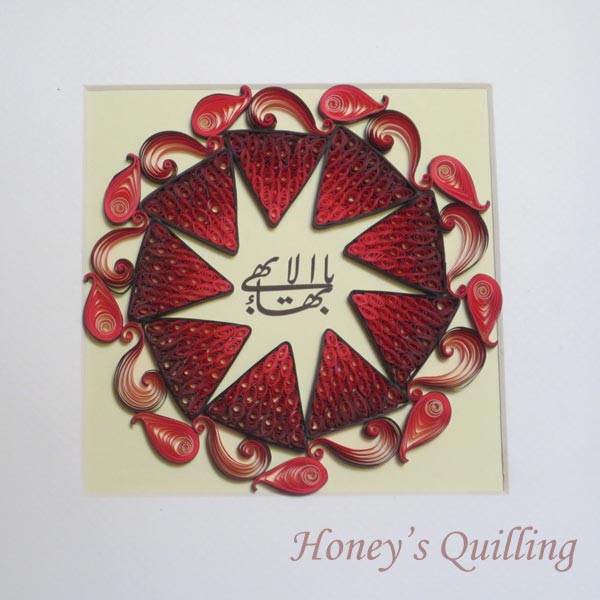
I decided to make a framed design, as it’s been a long time since I have done that, so it would be a nice change. I also decided to make it a nine pointed star frame design, as nine pointed stars are a symbol of the Baha’i Faith, of which I am a member.
For the base of my design I used a Border Buddy to make nine large black triangles. I then arranged my nine triangles into a star pattern and pinned them down (I used a compass to draw my own nine pointed grid to put under the plastic on my cork workboard so I could make sure my nine points were even!
I found it so difficult to choose a color theme! But I knew that if I didn’t give this as a gift, I would be hanging it on my own wall, so I went with a color theme that I like, red! Plus I was lucky enough to have several of Erin’s Culture Pop red colors in my stock, so I used those.
It can be tricky to find a lot of shades of a certain color that go well together, but Erin has made it easy with her WIDE range of colors! Someday I want to have all of her colors, but I just have a selection for now. The colors I used for this project were, from darkest to lightest:
The great thing about having so many shades of a color is that when you want to make a sort of ombre design like I did, you almost don’t even need to use the transitioning technique! I only used it between hubba bubba and red hot betty, and brandywine and speeding ticket. The other colors are really close to each other so they naturally transitioned.
I wish I could show you the progress photos of this project. I DID take progress photos, I just can’t find them or accidentally deleted them, I’m not sure. It’s frustrating!!
After I finished the base design, I tried it out in the frame and it looked like this:

I decided to add a Baha’i symbol to the middle, either the ring symbol or the Greatest Name symbol. My husband printed them out for me and I tried them out:

For all my photos of the frame I removed the glass in front. I never can get a good photo of something in a frame with glass over it! Here is a bit of a closeup: The strips of paper in the triangles were each about 2″ long.

I like the simple look of this design, but as it was for a contest, I decided to make it more fancy! So I added some designs around it including multi strip scrolls. Click here for a free tutorial on how to make the scrolls by Susan Quilling.

And a bit of a closeup:
Lastly I decided to decorate the matte of the frame as well, to make it a bit more fancy. I had a really hard time deciding what to do for the design on the matte! In total, I can’t tell you how many pieces I made, how many photos I took to look at side by side to see what I wanted to do. I even took a week off as I had other stuff to do anyway, and came back to it. Finally I decided on this:

I made larger multi strip scrolls, and I made the nine pointed stars that I make for my nine pointed star earrings, only I made each petal with three colors instead of just one, for that ombre effect. I loved how the little stars turned out, and actually made more in other color themes for earrings. I’ll be sharing those on the blog as soon as I get finished photos of them!
So it was the day before the deadline and I finished my design. Whew!!! Was I happy with it? Well, I liked the design I came up with, and I spent as much time as I could on it. I wish I had three times as much time, but with two girls at home, the housework, cooking, and a baby on the way, it was all I could do to devote an hour or two a day to the project (with much of that time being thinking and re-thinking my design LOL). I was just happy that I managed to participate with something larger than a pair of earrings!
In case you are curious, here are all of the entries for the contest. There was a wide range of types of designs and complexity. There were many seriously impressive designs that I could tell took weeks or even months to finish. Someday I’ll have the time to devote to quilling that I’d like. There are so many types of wonderful projects I want to try! It was fun looking at all of the beautiful entries, and fun being one of them!
Here is another view of my final piece:

As this nine pointed star frame would be a great gift, I did list it for sale in my Zibbet shop here, with varying degrees of complexity as seen in this post. I can make custom designs with all sorts of color themes and decorative accents. Have an idea you want me to make for you? Just ask!
- To see some other frames that I have made, click here!
- Click here to view more free paper quilling tutorials!
- Click here to view paper quilling tips and tricks!
- To find places around the world to buy quilling supplies, Click here!
*All products and supplies mentioned in this post I purchased and/or made on my own.
*This post contains some Amazon affiliate links, and some non affiliate links. If you purchase products through the affiliate links I get a small percentage (at no extra cost to you!). I only link to products that I believe in and/or love to use myself. Thank you for supporting my blog!


