
There is a new quilling tool in town! Well, it’s not *brand* new, but it is quite new and I just recently got my hands on one and have been having some fun!
Those who know my paper quilled jewelry know that I use quite a bit of forms when making my designs. This means I use items like pens, bottles, etc. to wrap the paper around to get an open circle shape. This open circle can be used as is, or can be pinched into other shapes like teardrops, paisley, marquis, etc.
I have never bothered trying to pinch my big circles into squares and triangles, however, as it can be tricky to get all the sides perfectly even. Also the sides can have a tendency to buckle and not be perfectly straight when you pinch like that. With the smaller circles it is okay, but the larger they are, the trickier it gets.
Enter the BORDER BUDDY!! The border buddy allows you to easily make circles, triangles, and squares of many sizes easily and evenly. Finally!!
So today I’ll share a few of the important basics about using the border buddy. And then you can look forward to some tutorials for specific projects coming up soon!
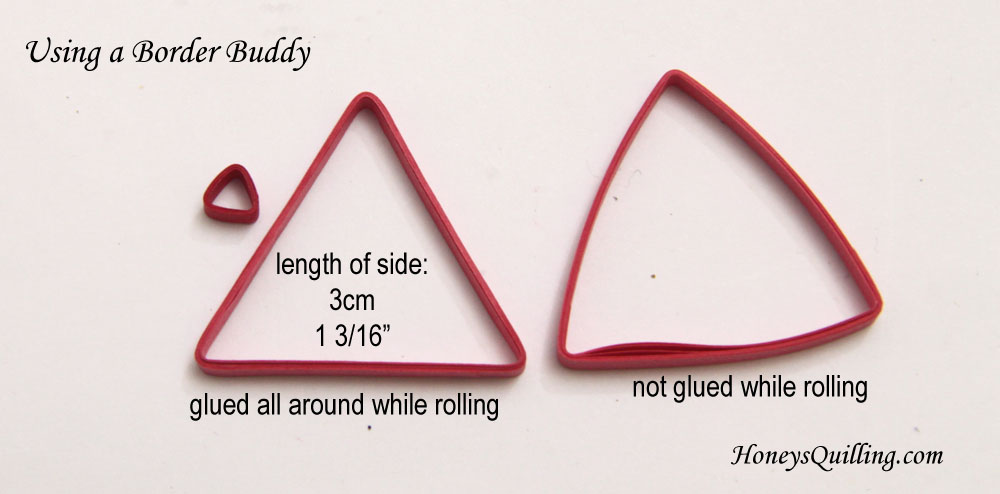
One of the first questions I was asked about this tool was how big the shapes get. An important question indeed! So in the below photos I will show the diameter or length of side of the largest shape. There is also a photo of the smallest shape for each one.
Another important tip I learned very quickly was that you can get a MUCH better looking shape if you glue the border all the way around while you are rolling the shape. In the photos below you will see a large shape that has been glued all the way around while it is rolled, and one that only had a bit of glue at the start and at the end. The ones that are glued all the way around are more sturdy, the sides are straight (not buckled) and the corners are sharper. The difference in the circle is not as noticeable, but I could still see it a bit. With the smallest size there is no need to glue all the way around as it is sturdy just because of its size. But from the second or third smallest size all the way to the largest, I highly recommend gluing! Here are a couple photos showing what I mean about gluing while rolling:

When I roll the square or triangle I dab glue on two sides instead of just one, as it saves time. With the circle I dab glue most of the way around each time. You must put the glue between every single layer to get the benefit, otherwise it’ll pop open on the side of your shape in the place where you didn’t put the glue.
This technique DOES have a downside, however. Usually when I roll an open shape I remove it from the form (usually a bottle/pen) and I set the shape down on my board. I pat the edge with my fingers so all the papers are lined up together and it then has a smooth edge. When you glue all the way around, the layers are stuck where they are and you can’t do this. So you have to be *very* careful about placing each layer right above the other as you roll it around so that they all line up nicely. It’s more difficult to get a flat edge, and mine aren’t perfect, but they are good enough and I’m getting better at lining up the paper as I go!
If you don’t like the look of the slightly uneven edge, you can certainly experiment with not gluing the edge and see if it works for you!
Okay, so here are the shape photos finally!


The triangle has the smallest of the smallest shape. It is actually kind of funny and has a taller top than the others, but the base of the top level makes a larger size than the tip of the top level, if that makes sense. The tiny triangle seen here is made with the tip of the top level.
Another tip is to go ahead and write numbers on the levels of your border buddy with a permanent maker. It will kind of rub off after you use it for awhile, but it is very helpful for remembering which level to use each time, especially if you are following a pattern. There might be a better way of writing than with sharpie markers, but that’s what I’ve tried so far. Here is how I did it:

The tool comes with one handle that you can put on the three different “towers”. I find the handle nice to use when using one of the larger size shapes. But when using the smaller shapes at the tip, I naturally don’t use the handle, I just turn the tower part itself. The handle is too far away to use for that. But it is still nice to use for the larger ones as it’s more comfortable to turn a smooth handle rather than a pointy cornered shape.
That’s all the tips for today, but I’ll be back soon with a fun tutorial using this tool! If you have any questions about the border buddy, let me know in the comments and I’ll get back to and/or add your answers to this post! If it is a big question I may write a new post to answer it.
Where Can You Get One?
Last but not least, here is where you can find your own border buddy! They are available at Custom Quilling, and on Amazon, as well as at most other shops that sell quilling supplies. If you are in India you can find a similar product at Let’s Quill On.

- Click here to view free paper quilling tutorials!
- Click here to view paper quilling tips and tricks!
- Click here to view a list of places to buy quilling supplies around the world!
- Click here to view some of my own quilling projects, with tips so you can make your own if you’d like!
*All products and supplies mentioned in this post I purchased and/or made on my own.
*This post contains some affiliate links, and some non affiliate links. If you purchase products through the affiliate links I get a small percentage (at no extra cost to you!). I only link to products that I believe in and/or love to use myself. Thank you for supporting my blog!


This looks a great tool where in Australia could I purchase one? and what are their cost please This looks like what I am looking for. Thanks for info
Hi Ruth 🙂 The cost differs depending on where you buy it from. It is least expensive in the US stores, but of course shipping will be more. There are a couple quilling shops in Australia that you can see on this page: http://www.honeysquilling.com/paper-quilling-supply-sources/ I looked at both and I don’t see it listed in their shops, but you can email them to see if they are planning on carrying it. It is a Quilled Creation product, which the second shop carries. Your other choice is to order it from overseas. Most quilling shops in the US are selling it, and I am selling it from Malaysia as well at http://HoneysQuillingShop.com and I ship worldwide.
Hi Ruth, I’m from Australia to, and buy the majority of my quilling supplies from Honey. Honey, is quick and very efficient in dispatching orders.
I had a bad experience…when I try first time..that u advice glue after each rolling….its result was bad…it’s like bad UN even shape.so pls. Give sm tips for this.thank u for that tool tricks n tips.
Hi Parul 🙂 Thank you for your comment. I think I know what you mean. If you don’t glue all the way around while rolling, then when you are done and take the shape off, you can pat it so it is flat on the edge. If you glue while you are rolling, you cannot do this. So you have to be reaaallly careful about where you place the paper as you are rolling, making sure to get it as even as possible because it will be stuck where it is and you can’t pat it flat afterwards. This will take some practice. You can also experiment with not gluing it as you roll and see if you can still get a shape you like. Everyone has their own technique which takes some experimenting 🙂
Looking forward to receiving mine, this little gem of a tool looks as if it will solve problems for me….. thanks Honey! 🙂
Yes, it’s a fun tool, I’ll be sharing a free tutorial soon for some earrings I made with it. I’m sure you will enjoy yours very much, packing it up tomorrow!
Thanks Honey, looking forward 🙂 Busy doing elephant cards at the moment!
cheers
Michele
Very helpful tips! I’ve been working on an idea I had with the square Border Buddy, but I’ve been having that problem with the sides. I didn’t even think to try gluing as I go, and it sounds like that’s definitely going to help with the snag I’ll run into when I go to put it all together with the bulging sides.
Glad to have helped, it definitely will make a huge difference in your design!
What are the individual sizes/diameters of the circles at the varuios/each level of the Border Buddy?
good question – I’ll do up a blog post about that soon 🙂
i am in india so where can i get one
You can check this page for some online shops in India that sell it: http://www.honeysquilling.com/paper-quilling-supply-sources/
I bought one off of Amazon that had 7 shapes, including a pentagon. It cost only about $9 dollars and so far I really like it! I bought it for jewelry. This post really helped. Thanks!
Sounds like fun!