
Have you been wanting to make some paper quilling hair clips? It’s so much fun to be able to wear your quilling creations! Today I’m sharing with you my collection of hair clips that I have made, along with tips on how to make your own. Or, if you are interested in purchasing ready made ones, click here to see what is instock in my shop. I can also do custom orders for other colors/designs.
I’ve made quite a few over the years, though it’s been awhile since I’ve made any. But I’m pretty much out of stock now, so one of these days I’ll have to make some more!
Below is a variety of hair clips that I made for a craft fair.


Above is the first order of hair clips that I made, a variety of colors of little flowers.
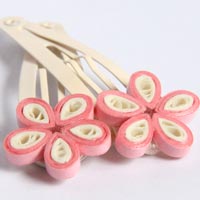
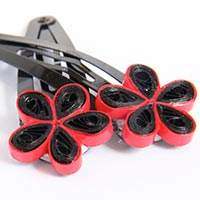
Small Flowers
Most of the first hair clips that I made were of the small flower design. It was simple, sturdy, and oh so cute and pretty! Here are a bunch I made in different colors. Click here to view the free tutorial for how to make the cute daisies. You can use them for earrings as well!


Circles
Circles make awesome shapes for hairclips, as they are very sturdy. The simple design goes with any outfit, and of course it can be customized in any color combo. Here are some tips for making great circles:
- Make the centers of your tight rolls smooth. Click here to learn how!
- Make your tight rolls flat and smooth. Click here for tips to learn how!
- Make cool spirals instead of the usual bullseye. Click here for the free tutorial!
- Circles make awesome earrings and pendants as well. Click here for the free tutorial!


Butterflies
I love these butterfly hair clips the best. They are just so adorable! They look more delicate than the other designs, but they really are very sturdy.
Click here for the free tutorial on how to make these butterflies!


Various
There are many other designs that can be used on hair clips. Here are two that I made. The designs themselves were not as sturdy as others, so I glued them onto a quilled tight roll and then glued that onto the glue pad of the hair clip. Click here to learn how to make a quilled 3D turtle. I made it much smaller for the hair clip, though!


Making Your Own
To make your own paper quilled hair clips you’ll need a few supplies:
- Your quilled pieces (could be the above circle, flowers, and butterflies, or something else of your choosing. Make sure it is sturdy if you want it to be long lasting! Nothing too delicate.
- Hair Clips: The best ones to use are the ones with the plastic pad on them, special for gluing onto. Glue just doesn’t stick well to the metal because it gets bent open and closed a lot. They are not always easy to find. You might be able to find them in a local craft store, or you can search online. I bought mine from different Etsy shops, you can shop around to see what is available. For those of you who like to shop from Amazon, below are a couple that are currently there. If you can only find blank hair clips that don’t have any plastic pad, you can still use them. I found that if you wind some thread around the end of them and then hot glue on top of the thread, it sticks just as well as with the plastic pad. It gives something for the glue to hang onto. Sometimes you will find hair clips that just have a hole at the end. You can use these as well, making sure that the hot glue has gone through the hole to the other side, so it kind of grabs onto the clip. They sometimes come off after some time if the glue pops through the hole. This is the case for all handmade hair clips, not just paper quilled ones. I like going the easiest but most sturdy route, so that’s why I use the ones with the plastic pad.


- Hot Glue Gun: I tried a LOT of different glues, and this one was the only one that worked all the time (on the plastic glue pad).
- Sealant/Topcoat: After you glue the paper quilling to the hair clip, you’ll need to protect it! I suggest dipping the piece (after it is glued) into a liquid sealer like Ceramcoat Sealer. After it is dry, use a thicker topcoat for extra protection such as Diamond Glaze, PPA matte, PPA gloss, or Triple Thick Glaze. To read all my reviews and tips about using sealant, click here.
- If you are in India, you can find accessories to make your own quilled hairclips and headbands at Let’s Quill On. Click on “shop” and they are under the “project supplies” category. The hairclips don’t have plastic pads on them, but they will still work well with hot glue if you wind a little bit of thread around the end of them before applying the hot glue, so the glue has something more to stick to.
I hope you enjoyed my collection of hair clips. I haven’t made any in more than a year! When I make them I usually make at least 5 or 6 pairs at a time, as it makes it more worth while to take out the hot glue gun. I feel like making some more butterfly ones!
Stick around, there is lots to see around the blog! Here are some places to start:
- Click here to view free paper quilling tutorials!
- Click here to view paper quilling tips and tricks!
- Click here to view a list of places to buy quilling supplies around the world!
- Click here to view some of my own quilling projects, with tips so you can make your own if you’d like!
*All products and supplies mentioned in this post I purchased and/or made on my own.
*This post contains some affiliate links. If you purchase products through the affiliate links I get a small percentage (at no extra cost to you!). I only link to products that I believe in and/or love to use myself. Thank you for supporting my blog!


